The rise of tilt-up construction: a modern approach to build

TL; DR

Tilt-up construction is a type of building method where large concrete panels are cast on the ground and then lifted into place to form the walls of a building.Tilt-up construction is a modern approach to building that offers a number of benefits over traditional construction methods.

Tilt-up construction involves casting concrete wall panels on site and then tilting them up into place using cranes. This process is faster, more cost-effective, and more sustainable than traditional construction methods, making it an attractive option for developers and contractors.

Tilt-up techniques are typically used to construct warehouses, office buildings, retail stores, and other large-scale structures. By using precast concrete panels instead of pouring the entire slab onsite, builders can save time and money on labor costs.

It is less labour-intensive than other construction methods, and thus requires a smaller crew to do the job.

Overview Of Tilt-Up Construction

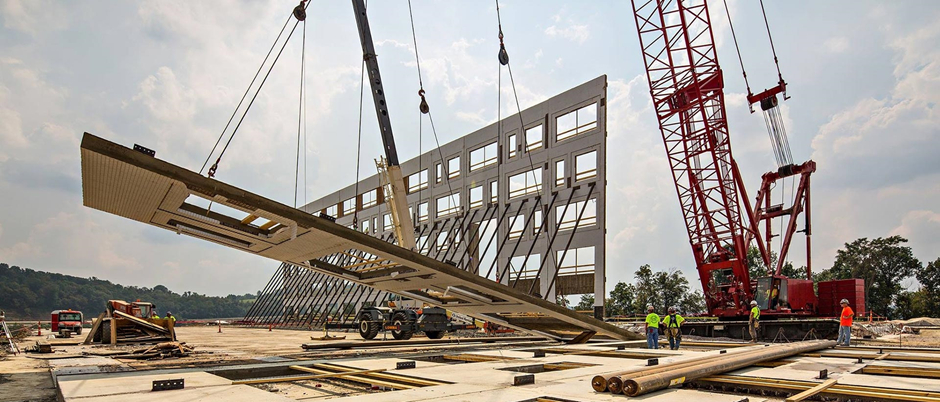
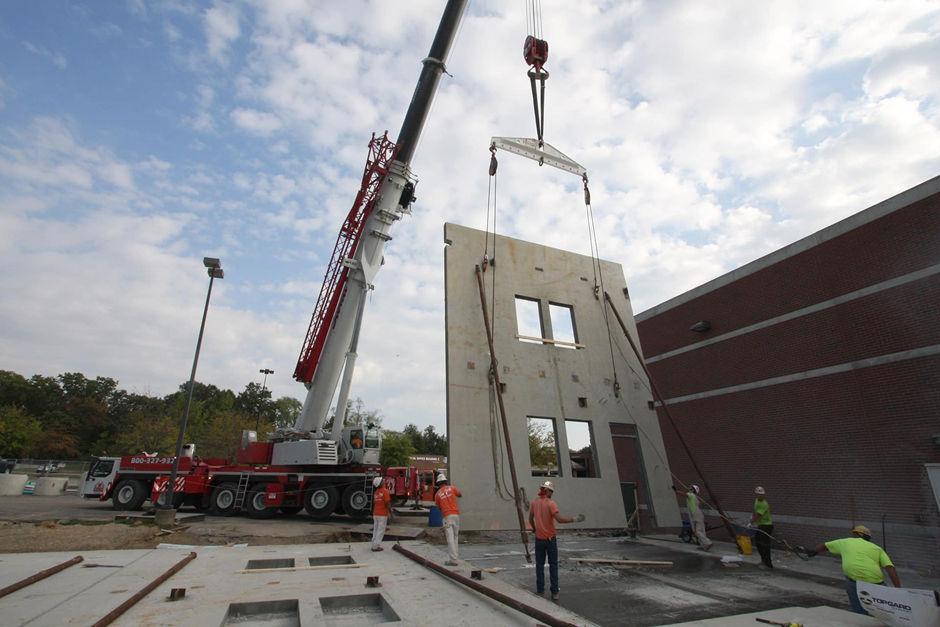
Tilt-up construction, also known as tilt wall construction or tilt slab construction, involves using large, precast concrete panels assembled on-site and then lifted into place.

This construction method is becoming popular due to its cost-effectiveness and time savings. In addition, tilt-up can be customised to meet specific needs, which makes it an attractive choice for many construction projects.

Tilt-up construction is generally more affordable than other building methods and comparatively faster than conventional methods. This helps it make a perfect choice for commercial and industrial buildings.

It eliminates the need for interior framing and is typically more durable than steel or wood-framed structures. It is also fire-resistant and less prone to damage from extreme weather, such as high winds and heavy rain.

Tilt-Up Construction – A Brief History

Tilt-up construction is an increasingly popular approach to commercial and industrial buildings due to its speed, affordability, and flexibility. The method involves pouring concrete into a formwork on the ground, which is then lifted or tilted into a vertical position using cranes.

The result is a monolithic wall of solid concrete that increases structural integrity and longevity. Tilt-up construction has been used since the late 19th century and has gained a resurgence of popularity in the United States.

Tilt-up is less expensive than traditional forms of construction; it has become increasingly popular in the residential and commercial sectors. Tilt-up construction is attractive for many reasons. It requires fewer materials than traditional methods and can be completed more quickly.

Additionally, tilt-up does not require additional support structures like steel bracing or wooden formwork, which reduces cost and labor. Tilt-up walls also offer greater insulation and fire protection, making them a safe option for high-rise buildings.

The Rise Of Tilt-Up Construction

Tilt-up construction is rising because of its immense demand and many advantages. It is a swift method of construction that allows for quick completion without sacrificing safety or quality.

Its precast components are easy to control and require minimal installation time, making it a favorite for builders. Because of the ease it has brought to the building industry, tilt-up construction is becoming increasingly popular.

The Process Of Tilt-Up Constructiony

The process of title-up construction is easy. With tilt-up construction, the walls are constructed offsite, transported to the site, and “tilted” up into place. This method eliminates many of the time-consuming steps associated with traditional construction methods.

The production process is as follows.

Materials Used In Tilt-Up Construction

In addition to being more efficient, tilt-up construction also uses fewer materials. Less material is wasted by constructing the walls offsite and then tilting them up into place onsite.

The material includes concrete, wood, and metal. The type of material used depends on the specific project but usually includes several layers of concrete with reinforcing steel rods to add strength and durability.

A Step-By-Step Explanation Of The Tilt-Up Construction Process

The step-by-step explanation is as under.

Pre-Construction

Before the tilt-up construction process can begin, the site must be prepared, and concrete forms must be constructed onsite. The design team will also need to create and approve plans for the building structure.

Wall Panel Assembly

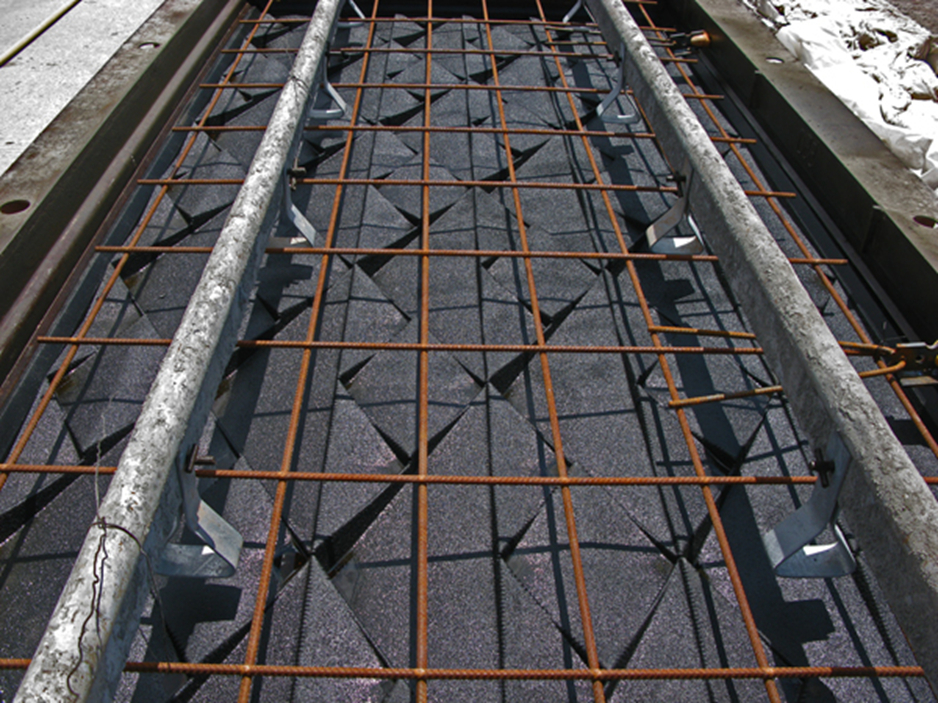
Once all necessary preparation work has been completed, wall panels can be constructed offsite in a controlled environment. It includes pouring the concrete, reinforcing it with steel bars, and allowing it to cure.

Transportation To Site

The wall panels are then transported to the site and placed into position using cranes or other heavy machinery.

Tilt-Up

After the wall panels have been placed, they can be tilted up and secured. This is done by connecting the vertical steel bars with horizontal ones and using large anchors or bolts to secure the wall panels.

Finishing

Once the walls are in place, they can be finished with insulation, drywall, siding, or other materials.

Comparison Of Tilt-Up Construction To Traditional Construction Methods

When compared to traditional construction methods, tilt-up construction offers several advantages. It is less labor-intensive since the walls are constructed offsite and transported to the site once completed.

This also eliminates the need for a lengthy framing process, which can sometimes take several weeks or months. Moreover, tilt-up construction reduces waste by eliminating the need for excess materials and a large workforce, allowing for a much more efficient building process.

Applications Of Tilt-Up Construction

Tilt-up construction has been increasingly used in the blog and commercial construction sector due to its cost-effective design, speed of delivery, and versatility.

Its applications range from large-scale warehouse and industrial complexes to commercial office buildings, educational facilities, car dealerships, retail stores, churches, and more.

Commercial And Industrial Buildings

Tilt-up construction is the perfect choice for large industrial and commercial buildings. Tilt-up panels mean fewer workers are needed on-site, allowing projects to be completed more quickly than traditional construction methods.

Retail And Office Spaces

Tilt-up construction is also well suited for use in retail stores, as it allows the store to be built quickly and efficiently. Its use of precast panels can reduce the amount of labor required, resulting in reduced costs and shorter timelines.

The panels also allow for better acoustics and increased energy efficiency, making them an ideal solution for retail stores.

Warehouses And Distribution Centers

Tilt-up construction is a great choice for warehouses and distribution centers. The precast panels used in tilt-up construction are lightweight yet strong, providing superior insulation compared to traditional construction methods. It makes them well-suited for these applications.
Furthermore, precast panels provide superior soundproofing, making them an ideal solution for warehouses and distribution centers.

Educational Facilities

Tilt-up construction is also perfect for educational facilities such as schools and universities. Builders can use it to create classrooms, libraries, cafeterias, and more, allowing educational institutions to benefit from the cost savings and speed of tilt-up construction.

Car Dealerships

Tilt-up construction is also being increasingly used in car dealerships due to its flexibility and ability to be built quickly. The panels are strong and durable, meaning they can withstand the wear and tear associated with a dealership.

Advantages Of Tilt-Up Construction

The advantages of tilt-up construction make it an attractive option for developers and businesses looking to build efficient, cost-effective structures. From exterior finishes to energy efficiency, tilt-up construction is a versatile tool used in various contexts to create durable, customized buildings at competitive prices.

Speed And Efficiency Of Construction

Many tilt-up construction projects can be completed in a fraction of the time of traditional on-site construction methods, allowing developers to open quickly and generate revenue sooner.

It means lower labor costs, less overhead, and quicker turnaround times for businesses that need to open sooner than expected.

Strength And Durability

Tilt-up concrete structures are strong and durable, capable of withstanding extreme weather conditions such as hurricanes, earthquakes, hail storms, and more. The strength of tilt-up construction makes it ideal for businesses looking for long-lasting and reliable structures.

Cost-Effectiveness

Tilt-up construction is faster than traditional methods, requires fewer materials, and is associated with lower construction costs. This cost-effectiveness makes tilt-up construction an attractive option for businesses of any size.

Sustainability And Energy Efficiency

Tilt-up structures are more energy efficient than traditional on-site construction methods, resulting in lower utility costs for businesses over time. Additionally, tilt-up construction is an environmentally friendly method of building, as the materials used are often recycled or sustainably sourced.

Flexibility And Customization

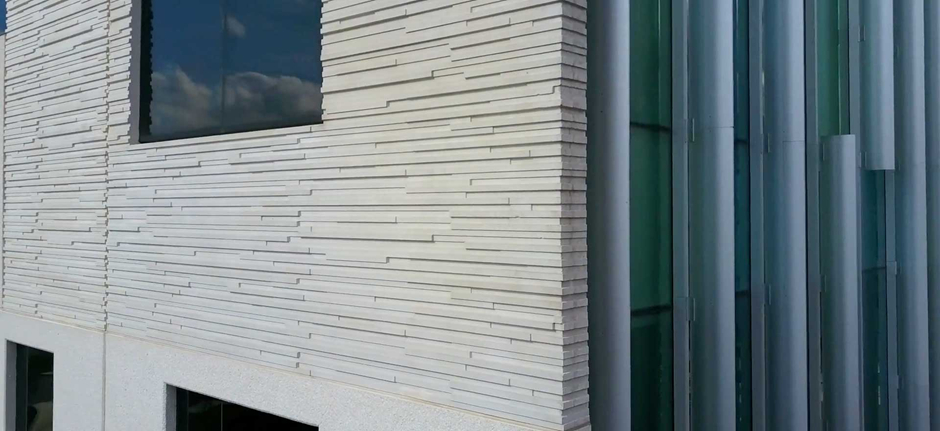
Tilt-up construction can also provide great flexibility when it comes to the design of your structure. The panels for tilt-up construction are blank canvases that can be easily modified with various decorative finishes and colors.

It allows developers to customize their buildings based on the specific needs of their businesses or organizations, creating a unique and tailored space that can serve multiple purposes.

If you’re looking to reduce costs and complete your project quickly, consider tilt-up construction for your next building project.

Challenges And Limitations Of Tilt-Up Construction

Tilt-up construction also presents certain challenges and limitations which should be considered before embarking on a tilt-up project.

Careful Planning

One of the main challenges of tilt-up concrete is that it requires careful planning to ensure that all elements are properly connected and secure. If the panels are not connected properly, movement of the building can occur due to wind or seismic activity.

Construction Framework

Tilt-up construction involves constructing formwork and pouring concrete on site, creating a more labor-intensive process than precast concrete. As a result, increased cost factors may be related to the labor required.

Limited Design Flexibility

Tilt-up construction also involves limited design flexibility because all members must be formed on-site and remain in their place during and after the pour. It can limit the range of shapes, spaces, and textures available when designing a tilt-up structure.

Tilt-up walls may not be able to provide good insulation due to air infiltration around the panels.

Site Preparation And Foundation Requirements

Preparing the site for a tilt-up building requires special attention to ensure that the foundation is level and can support the weight of the panels. You must maintain proper drainage during construction to avoid water damage.

Weather Constraints

Tilt-up concrete is sensitive to weather conditions, and excessive rain or wind can delay or damage a project. The temperatures and humidity during the concrete pouring must be monitored to ensure that the concrete cures properly.
Extreme temperatures can cause cracking or shrinkage in tilt-up walls.

Heavy Equipment And Crane Requirements

To complete a tilt-up construction project, heavy equipment and cranes are typically required to lift and place the panels into their proper places. It can add cost to a tilt-up project.

Time Considerations

Tilt-up structures require more time than precast concrete structures, as all elements must be formed on-site and cured before the building can be assembled. As a result, tilt-up construction may not be an ideal option for projects with tight timelines.

Safety

Tilting up walls requires working at heights and using heavy equipment and cranes, posing safety risks if proper precautions are not taken. Concrete dust created during the process can be a health hazard.

Future Outlook For Tilt-Up Construction

The future of tilt-up construction looks bright. Advancements in engineering and technology have allowed tilt-up concrete walls to be made stronger than ever before, as they are now designed to withstand greater loads and seismic activity with minimal additional reinforcement.

In addition, modern tilt-up structures have the potential to be constructed with much faster timelines than traditional masonry or poured-in-place concrete buildings.

Energy Efficient

Innovations in materials and processes have enabled tilt-up construction to be more energy efficient than ever before. For example, insulating concrete forms (ICFs) allow for thermal resistance while still providing the strength of a tilt-up wall.

Additionally, porous concrete helps reduce stormwater runoff, limiting environmental impacts.

Cost Saver

The cost savings associated with tilt-up construction are a major driving factor in the industry’s future outlook. Tilt-up structures can be erected quickly and require less labor than traditional building methods, resulting in lower upfront costs.

Furthermore, tilt-up walls have fewer maintenance needs, resulting in long-term savings.

Aesthetic Potential

The future of tilt-up construction also includes capitalizing on its aesthetic potential. With the right design and materials, tilt-up walls can be transformed into beautiful features such as paneling, cornices, and decorative accents.

This versatility allows for more creative freedom when designing and building with this method.

Overall, tilt-up construction offers many advantages to builders and developers. With its cost savings, energy efficiency, and aesthetic potential, the future outlook for this construction method is optimistic. As technology continues to advance, so will this building approach.

Understanding Thin Brick: An In-depth Guide to Features, Applications, and Installation

Thin brick is revolutionizing modern construction. This versatile material mimics the appearance of traditional bricks while offering several advantages. Its lightweight nature and ease of installation make it a popular choice in contemporary architecture.

Key takeaway: Thin brick offers a perfect blend of aesthetic appeal and practical benefits, making it ideal for various architectural applications.

In this article, you’ll learn:

  • What thin brick is and its unique characteristics
  • Why thin brick is an excellent choice for construction projects
  • Various applications of thin brick in residential and commercial settings
  • A detailed guide on how to install thin brick efficiently and effectively

What is Thin Brick?

Thin brick is a lightweight construction material designed to mimic the appearance of traditional bricks. Unlike conventional bricks, which are several inches thick, thin bricks typically measure around 0.5 inches in thickness. This significant reduction in size provides several advantages, including ease of handling and installation.

Unique Characteristics of Thin Brick

  • Lightweight: The reduced thickness makes thin bricks much lighter than traditional bricks, easing the transportation and installation process.
  • Versatility: Available in a variety of colors, textures, and finishes, thin brick can replicate the look of materials such as stone or wood.
  • Cost-Effective: Less raw material is used in manufacturing thin brick, making it a more economical option without sacrificing aesthetic appeal or durability.

Types of Thin Brick

Several types of thin brick are available to suit different applications:

  • Thin Brick Veneer Commonly used for both interior and exterior walls.
  • Offers the classic look of full-sized brick at a fraction of the weight.
  • Thin Brick Tile Ideal for flooring and smaller surfaces like backsplashes.
  • Provides a durable and visually appealing finish.
  • Thin Brick Wall Panels Prefabricated panels that incorporate multiple thin bricks.
  • Simplifies installation by reducing the need for individual brick placement.
  • White Thin Brick Features a clean, modern aesthetic perfect for contemporary designs.
  • Available in various shades of white to fit different design schemes.

Standard Dimensions and Variations

The standard dimensions for thin bricks are approximately:

  • Length: 7.5 inches
  • Width: 2.25 inches
  • Thickness: 0.5 inches

However, these sizes may vary depending on the manufacturer. Some manufacturers offer custom sizes to meet specific project requirements.

Understanding these basic elements helps you make informed decisions when choosing thin brick for your construction projects.

Why Choose Thin Brick for Your Construction Projects?

Lightweight Construction

One of the main advantages of thin brick is its lightweight nature. Traditional bricks are bulky and heavy, making them more challenging to handle and install. In contrast, thin bricks are much lighter, which allows for easier handling during installation. This lightweight characteristic means that thin brick can be used in places where traditional bricks might not be feasible due to weight constraints.

Diverse Aesthetic Options

Thin brick offers a wide range of aesthetic options. Whether you’re aiming for a rustic look or a sleek, modern facade, thin brick provides designers with the versatility to achieve these desired appearances without compromising on quality. Available in various colors, textures, and finishes, you can find thin brick that mimics other materials like stone or even wood. This diversity enables you to customize spaces to fit specific design themes seamlessly.

Cost-Effective Solution

Thin brick is also a cost-effective construction material. Its smaller size and reduced weight mean less raw material usage compared to traditional bricks. Additionally, the ease of handling and installation can significantly cut down labor costs. The use of specific mortar for thin brick allows it to adhere well to various surfaces like drywall and plywood, reducing the need for extensive preparation work.

  • Less Raw Material: The production of thin brick requires fewer resources.
  • Reduced Labor Costs: Easier handling translates into less time and effort during installation.
  • Minimal Waste: Precise manufacturing processes result in less material waste.

Choosing thin brick for your construction projects combines aesthetic flexibility with practical benefits such as ease of installation and cost savings, making it an ideal choice for both residential and commercial applications.

Exploring the Versatile Applications of Thin Brick

Thin brick is a highly adaptable material that can be used in both residential and commercial settings. Its ability to enhance interior design and exterior facades makes it a favorite among architects and designers.

Interior Design

Accent Walls

  • Thin brick accent walls add texture and visual interest to living rooms, bedrooms, or kitchens.
  • Available in various colors and finishes, they can match any design theme from rustic to modern.

Fireplaces and Backsplashes

  • Transform your fireplace into a focal point with thin brick cladding.
  • Kitchen backsplashes made from thin brick offer an easy-to-clean surface that also provides a stylish backdrop.

Exterior Facade

Building Exteriors

  • Ideal for upgrading the facade of homes or commercial buildings.
  • Durable and weather-resistant, making it a practical choice for long-term use.

Entryways

  • Enhance curb appeal with a welcoming thin brick entryway.
  • Customizable to fit any architectural style.

Flooring Options

Indoor Flooring

  • Thin brick can be used for indoor flooring, providing a unique aesthetic that mimics traditional brick floors.
  • Suitable for high-traffic areas due to its durability.

Outdoor Patios

  • Create charming outdoor spaces like patios or walkways.
  • Offers slip-resistance, making it safe for outdoor usage.

Landscaping Features

Garden Paths

  • Thin brick paths can guide visitors through gardens while adding an element of classic beauty.
  • Easy to install and maintain, making them an excellent DIY project.

Retaining Walls

  • Construct retaining walls that blend naturally with the landscape.
  • Provides both functional support and aesthetic enhancement.

Thin brick’s versatility allows it to be used in many applications, each bringing its timeless charm into different environments. This adaptability ensures that whether you’re working on an interior design project or enhancing an exterior facade, thin brick will meet your needs.

A Step-by-Step Guide to Installing Thin Brick Like a Pro!

1. Preparing Your Wall Surface for a Flawless Finish

Proper wall surface preparation is essential to ensure the successful installation and longevity of your thin brick project. Skipping this step can lead to adhesion problems and an uneven finish.

Key steps in wall surface preparation:

  • Clean the Surface: Remove any dirt, dust, or grease from the wall. Use a mild detergent and water solution, then allow the wall to dry completely.
  • Repair Any Damages: Fill holes, cracks, or uneven sections with appropriate filler material. Sand down any rough patches to achieve a smooth surface.
  • Check for Moisture: Ensure the wall is dry. Moisture can weaken the adhesive bond and cause long-term damage.
  • Prime or Seal the Surface: Depending on the substrate, apply a primer or sealant to create an ideal bonding surface. For example, use a masonry primer on concrete walls and a wood sealer on plywood surfaces.

Example: For drywall surfaces, you might use a high-quality latex-based primer to ensure proper adhesion of the thin brick mortar.

By meticulously preparing your wall surface, you set the stage for a durable and visually appealing thin brick installation. This groundwork ensures that your project remains robust and attractive for years to come.

2. The Ultimate Step-by-Step Installation Process You Need to Follow!

Installation Guide for Thin Brick

Installing thin brick can be a rewarding project when done correctly. Here’s a detailed step-by-step installation process to ensure your thin brick application looks professional and lasts for years.

Step 1: Gather Your Materials and Tools

To start, you’ll need:

  • Thin bricks
  • Thinset mortar
  • Notched trowel
  • Level
  • Spacer clips
  • Grout
  • Grout float
  • Metal lath (for plywood substrates)
  • Backer board or drywall (for wall surfaces)
  • Measuring tape
  • Chalk line
Step 2: Preparing the Substrate

For Plywood Surfaces:

  • Attach metal lath securely to the plywood.
  • Apply a scratch coat of mortar over the lath, ensuring it is evenly spread.
  • Let the scratch coat cure for at least 24 hours.

For Drywall Surfaces:

  • Ensure the drywall is clean and free of dust.
  • Use a notched trowel to apply a layer of thinset mortar directly onto the surface.
Step 3: Layout Planning
  • Measure and mark guidelines on your wall using a chalk line.
  • Plan your layout by dry-fitting the thin bricks, starting from the bottom center and working outward.
Step 4: Applying Thinset Mortar
  • Using a notched trowel, spread the thinset mortar over a small section of your substrate.
  • Hold the trowel at a 45-degree angle to create grooves in the mortar for better adhesion.
Step 5: Placing Thin Bricks
  • Press each brick firmly into the mortar, aligning with your chalk lines.
  • Use spacer clips between bricks to maintain even gaps.
  • Continue placing bricks row by row, checking regularly with a level.
Step 6: Cutting Bricks for Edges and Corners
  • Measure and mark bricks that need cutting for edges or corners.
  • Use a wet saw or tile cutter for precise cuts.
Step 7: Filling Joints with Grout
  • After all bricks are in place, allow them to set for at least 24 hours.
  • Mix grout according to package instructions.
  • Use a grout float to fill joints, pressing grout into spaces between bricks.
Step 8: Cleaning Excess Grout
  • Wipe away excess grout from brick surfaces using a damp sponge.
  • Allow grout to cure per manufacturer’s recommendations before touching up any areas if needed.

This method ensures you achieve a flawless finish while working with various substrates like plywood or drywall effectively.

3. Post-Installation Care: Keeping Your Thin Brick Beautiful Over Time!

Maintaining the beauty of your thin brick installation requires attention to detail during the post-installation phase. Proper care will ensure durability and aesthetic appeal.

Filling Joints with Grout

  • Vacuum Dust: Before applying grout, vacuum the wall surface thoroughly to remove any dust and debris. This step is crucial for ensuring a clean and secure bond.
  • Choose the Right Grout: Select a grout that complements your thin brick’s color and texture. The right grout enhances the overall look of your installation.
  • Applying Grout: Use a grout bag or a trowel to fill the joints between the bricks evenly. Make sure to press the grout firmly into the joints to avoid gaps.
  • Smooth and Clean: After filling, smooth out the joints with a pointing tool or your finger for a uniform finish. Wipe away excess grout from the brick surfaces using a damp sponge before it dries.

Sealing for Longevity

  • Sealant Application: Applying a high-quality sealant can protect your thin bricks from moisture, stains, and wear. Follow the manufacturer’s instructions for best results.
  • Regular Cleaning: Maintain your thin brick surfaces by cleaning them regularly with mild soap and water. Avoid harsh chemicals that may damage the finish.

Proper post-installation care not only preserves the appearance but also extends the life of your thin brick installation.

Conclusion: Embracing the Timeless Beauty of Thin Brick in Modern Construction Projects

Incorporating thin brick into your construction projects offers a myriad of benefits. Architects and builders can achieve the classic look of traditional bricks without the associated weight and labor costs. The versatility and cost-effectiveness of thin brick make it an ideal choice for both residential and commercial applications.

Key Benefits:

  • Aesthetic Appeal: Mimics traditional bricks, offering diverse colors and textures.
  • Ease of Installation: Lightweight nature simplifies handling and installation.
  • Cost-Efficiency: Reduced raw material usage and labor requirements.

Thin brick provides a durable, attractive, and practical solution for modern construction needs. Its ability to enhance various settings ensures that it remains a valuable component in contemporary architecture. Embrace thin brick to elevate your next project with timeless beauty and efficiency.

FAQs (Frequently Asked Questions)

What is thin brick and how does it differ from traditional bricks?

Thin brick is a modern construction material that offers a unique blend of aesthetic appeal and practical benefits. Unlike traditional bricks, thin bricks are lighter and can be used in various applications without the bulkiness associated with standard bricks.

What types of thin brick are available in the market?

There are several types of thin brick available, including veneer, tile, wall panels, and white thin brick. Each type comes with standard dimensions and variations depending on the manufacturer, allowing for diverse design options.

Why should I choose thin brick for my construction projects?

Thin brick is advantageous due to its lightweight nature, which simplifies handling and installation. It also offers a wide range of aesthetic options while being cost-effective due to reduced raw material usage and lower labor requirements during installation.

In what applications can thin brick be used?

Thin brick can enhance both interior and exterior spaces in various settings, such as residential homes and commercial buildings. Specific applications include accent walls, exterior facades, fireplaces, backsplashes, flooring options, and landscaping features like garden paths or retaining walls.

What steps should I follow to install thin brick properly?

To install thin brick effectively, start by preparing the wall surface to ensure proper adhesion. Follow a detailed step-by-step installation process based on your chosen substrate (e.g., plywood or drywall). After installation, maintain your thin bricks by filling joints with grout after vacuuming dust from the wall surface.

What are the post-installation care tips for maintaining thin bricks?

Post-installation care involves ensuring that joints are filled with grout after cleaning the wall surface. Regular maintenance will help keep your thin brick looking beautiful over time and preserve its timeless charm in your construction projects.

The process of creating and installing architectural formliners

TL; DR

The process of creating and installing architectural formliners is an important part of modern construction, allowing designers and builders to create unique and visually appealing concrete surfaces.

With the use of high-quality materials and careful attention to detail, architectural formliners can help shape the built environment and bring character and texture to a wide range of construction projects.

Creating the formliner begins with selecting the material (foam or plaster) that will be used and then shaping it into the desired design. Afterward, the liner must be sealed and air-dried.

Once the formliner is finished, the next step is to install it into whatever wall or facade you are working on.

This installation process can involve attaching anchors or screws and then applying a layer of adhesive to secure the formliner. With patience and skill, anyone can create and install their architectural formliners!

Overview Of Installing Architectural Formliners

Installing architectural formliners is a great way to give your building or landscape design an extra visual interest. Formliners bring texture and dimension to concrete walls, ramps, benches, and other elements. They can be used for both exterior and interior applications. Plus, they’re highly customizable; you can choose from a wide variety of patterns and designs to make your project one of a kind.

Creating and installing architectural formliners can be straightforward with the right guidance. By utilizing the correct processes and techniques, architects can ensure that their buildings are strong and aesthetically pleasing for years to come. Formliners provide a creative way of making concrete more attractive while also protecting it from damage caused by weathering.

This blog will provide an overview of the steps involved in installing architectural formliners. Keep reading to learn more.

Importance Of Formliners In Modern Architecture

Formliners have become an increasingly popular choice in modern architecture, and for a good reason. Formliners are designed to create a seamless transition between the exterior of a building or structure and its interior, creating a unified look. By using formliners, architects can achieve desired visual effects while also providing structural integrity.

Formliners can create various patterns and textures on the exterior of a building, including wood grain, stone, brick, or other unique designs. It allows architects to customize their buildings to fit the needs of every project. Additionally, formliners are designed to be durable and weather-resistant and can last for decades with minimal maintenance.

Process Of Installing Architectural Formliners

Once you have selected the architectural formliners that best suit your project and budget, installing them is next. It can be done in several ways depending on how long-term or short-term you need the formliner to remain in place and considering ease of use and cost-effectiveness.

Materials And Techniques

The materials you will need to install architectural formliners depend on the formliner product and installation technique you choose. It is important to read through the instruction manual for your specific product carefully to understand what components are required and how they should be installed.
In most cases, some type of adhesive such as polyurethane-based adhesive, will be needed to install the formliner. Other installation methods, such as mechanical anchors, may be used if your chosen product does not require an adhesive.

Installation Process

The techniques include CNC routing, water jet cutting, or traditional chiseling and carving. In some cases, steel mesh may add extra strength to the installation.

Design And Production

Once you have selected the installation materials and decided on an installation technique, it is time to begin designing and producing the formliners. Depending on the size of your project, this can be done with various tools, such as CNC routers, water jet cutters, or hand carving tools.

It is essential to consider how best to design and produce the formliners, considering factors such as the size and complexity of the project, time constraints, cost-effectiveness, and any other special requirements.

Manufacturing And Quality Control

Manufacturing and Quality Control are two important aspects of architectural formliner installation. The manufacturing process begins with selecting raw materials such as concrete, plaster, rubber, and other composites to create different textures and shapes. Once the desired shape is achieved, a mold is created, which will be used for production. During this stage, stringent quality control measures are implemented to ensure that the formliners meet all industry standards.

The next step in the manufacturing process is to apply a protective coating to the mold, which helps protect it from damage and wear. It is followed by casting, and the desired material is poured into the mold.

In this stage, quality control measures, such as inspecting the formliner for any cracks or imperfections, are also implemented.

Once the formliner is cured and inspected, it is ready for installation.

Importance Of Manufacturing And Quality Control

Importance of quality control in the manufacturing process of architectural formliners cannot be overstated. Quality control measures ensure that the formliners are produced with precision and accuracy, according to the highest standards of quality. This ensures that each product meets the customer’s expectations and is safe for use in any project.

Manufacturing processes must adhere to strict guidelines. Every step in the manufacturing process must be completed correctly to create a product that meets all safety and quality requirements.

Final Steps

Finally, once you have produced the formliners and are ready to be installed, a few final steps should be taken. It includes ensuring that the formliners are properly secured, that any adhesives or mechanical anchors are correctly applied, and that all necessary safety precautions are taken.

It is also important to check the formliners for any imperfections or inconsistencies before installing them, as these can be difficult to detect after installation. Once these steps have been completed, the architectural formliners are ready to be installed and will enhance the look of your project.

Installation

Installation of architectural formliners can be a relatively easy and cost-effective process. With careful planning and suitable materials, you can create stunning results that will last for years. For installing architectural formliners,

1. Choose the formliners that are appropriate for your project.
2. Read through the instruction manual for your chosen product carefully to understand what components you
need and how to install them.
3. Design and produce the formliners using CNC routers, water jet cutters, or hand carving tools.
4. Secure the formliners properly and apply any necessary adhesives or mechanical anchors.
5. Check the formliners for any imperfections before installing them.
6. Once all steps are complete, you can install the architectural formliners and enjoy their beauty in your
project!

Importance Of Proper Installation

When it comes to installing architectural formliners, accuracy and precision should be prioritized to ensure a successful final product. By investing in quality installation services, architects can rest assured that their vision will come to life and last for many years to come.

The importance of proper installation is also relevant for structural integrity and function. In some cases, improperly installed formliners can move or shift due to any number of environmental risks, such as temperature changes or incorrect curing time. This can cause permanent damage to the formliner as well as any adjacent materials during installation. It can also lead to a loss of structural integrity and decrease the product’s overall lifespan.

Without proper installation, there can be gaps in the overall design, which can lead to visible inconsistencies in the finished product. Additionally, improper installation can reduce or eliminate any water or air-tight seal that may be necessary for the formliner to have a lasting, durable finish.

Maintenance And Upkeep

Maintenance and Upkeep are key components of any architectural formliner installation. The maintenance and upkeep of the formliners will ensure that they are in good condition and look great for years to come.

Here’s what maintenance does to your architectural formliners.

Extends Life

With regular maintenance, it will help to extend the life of the formliner and prevents them from becoming damaged or worn due to weather conditions.

Environmental Protection

During installation, it is important to use appropriate sealants and finishes to protect the formliner from environmental factors like moisture, heat, cold, and UV rays. Additionally, regular inspections should be conducted to check for any signs of damage or wear.

The frequency of maintenance and upkeep for architectural formliners will depend on the environmental conditions in which they are installed. If the formliners are installed in a more extreme climate, then it may be necessary to perform maintenance and upkeep more frequently than if they were installed in a milder one.

Identifies Problems

Regular inspections can help to identify any potential problems early on before they become too costly or difficult to repair.

Saves Money

Taking the time to inspect, clean, and maintain these products can save money in the long run, while ensuring that they look their best throughout their lifespans.

Prevents Contamination

Regular cleaning is also essential for proper maintenance and upkeep of architectural formliners. Dirt and dust can accumulate on the surface of the formliner, causing it to look dingy and dull.

To avoid this, the formliner should be routinely washed using a mild detergent or cleaning solution. Afterward, the surface should be dried with a clean cloth or soft brush to prevent any water spots from forming.

It is important to follow all the manufacturer’s guidelines for proper installation and maintenance of the formliner so that it can continue to look its best for years to come.

Developments In Architectural Formliners

Developments In Architectural Formliners have been a real game-changer for architects and designers. Historically, formliners were used to create molds filled with concrete or other substances to create designs with unique textures and shapes. However, technological advancements have allowed for much more intricate detailing and architectural elements to be added to the design of these structural components.

Architects can now design more complex patterns, shapes, and textures with the use of formliners that can be used to create a variety of looks for any building or structure. This development has opened up new possibilities for architects and designers to experiment with their designs and create truly inspiring works of art.